HOW TO TRAIN YOUR CORE BETTER: PART 4 ANTI-LATERAL FLEXION
Welcome back to the discussion of your core and how to train them. This is the final installment of the core series, and if you are new and have not read the previous articles, you can check them out here: Part 1, Part 2, and Part 3.
This article will talk about anti-lateral flexion, what it is, what exercises you can do, and how you can progress.
So what is anti-lateral flexion?
It is a mouthful, I know, but think about it like this. While standing straight up with your hands by your side,without twisting, bend sideways and touch the side of your knee.
That is flexing laterally, so anti-lateral flexion is preventing the movement of bending sideways.
Training to prevent this bend of the side will improve your ability to do things around the house while reducing the risk of soreness or pain in the low back.
Take a minute and think about all the inside and outside house chores and everyday life.
How often are you carrying something on one side of the body?
Groceries, bucket of dirt/water, weed eater, shovel/rake, carrying a baby, suitcase, purse, and many other examples.
Oftentimes, these are small tasks, but details matter.
Holding a purse on the same side multiple times a day, every day can accumulate stress if you don’t think about what the hips and low back are doing.
The small details matter.
How you position your body during these movements can help you be confident with the task at hand without fatigue, soreness, or worse injury.
I say injury, but typically it is more of a chronic pain issue. When you do the same movement over and over, especially if one side of the body is working, then you create some imbalances.
These imbalances create some weaknesses on one side, and the body has to compensate for this weakness.
Easy solution is to strengthen those imbalances and work on being balanced.
Nothing to be afraid of and I want to be clear, you do not have to be 1:1 balanced from left to right side.
That’s impossible.
You just don’t want one side to be over dominant. Just because you can’t be balanced, doesn’t mean you can’t work for it.
Alright, now that I have explained what anti-lateral flexion is, and why it’s important, let’s get to the exercises.
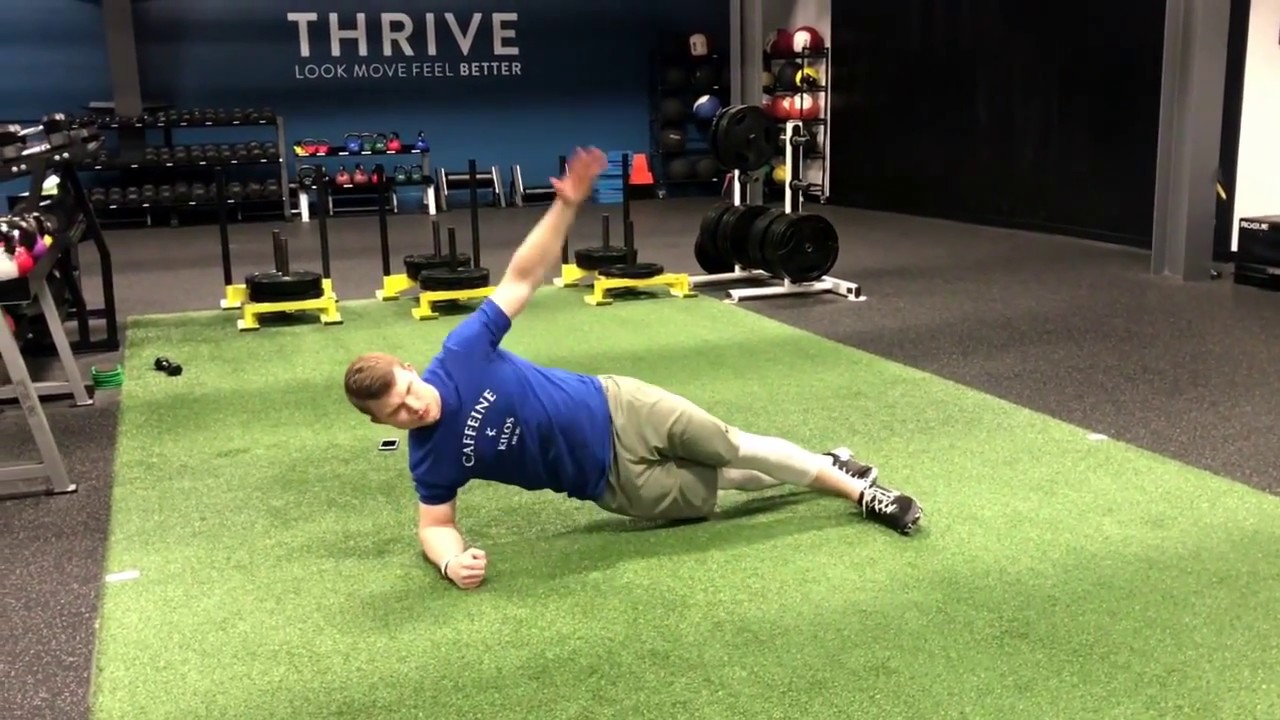
STEP 1: SIDE PLANKS
First exercise I am sure you have seen before, and even performed yourself is the side plank.
Side planks are a great exercise to get started and work on strengthening the side of your core.
First step to get started is simple, just lay on your side. Try and create a straight line going from your head to your feet.
Position your elbow directly below the shoulder and lift hips off the ground. For balance you can place your top leg in front of the bottom leg.
While hips are in the air, brace the core and squeeze your butt cheeks together.
Check to see if your body is aligned. You don’t want the hips behind you or twisted.
Keep the hips pushed forward, just enough to be aligned to keep it from twisting.
Hold this position for the desired time, then switch sides and repeat.
You can start with :15 for 3 sets and build up from there.
Keep full body tension during the whole time.
STEP 2: SUSPENSION TRAINER SIDE PLANKS
For this next exercise, you will need access to a suspension trainer. This progression will increase the demand on the stability of the core to prevent movement in the spine, and hips.
The bottom of the foot straps should be adjusted so that it hangs at your midshins.
Lie down on your side and place your feet into the foot straps.
Position yourself into a side plank, use the steps that I mentioned previously.
Keep your body in a straight line, with the feet elevated, the demand to keep this straight line increases. Fight the urge to twist and bend at the hip. Keep the core braced and butt cheeks clenched.
You can start this with :15 second hold on each side for 3 sets, and progress from there.
STEP 3: SIDE PLANK + SINGLE ARM ROW
This step increases the demand on the stability of the core. With the movement of the row, you have to concentrate more to keep the hips and low back from twisting.
I want to be clear, the single arm row part of this exercise is not meant to be heavy. You will not be able to keep good form with heavy rows.
While in a side plank position, go back to step one for set up, the free arm is rowing. The cable machine or if you are using a band will be in front of you in a side plank position.
For this exercise I like to keep the reps high in the 15-20 rep range. Keep hips from moving, especially while rowing.
Start with 3 sets of 15-20 reps, and you can progress with weight, or intensity of the band.
STEP 4: SUITCASE CARRIES
This next step with the progressions, you are moving from the floor to standing upright and walking.
Don’t worry, it’s more than just walking.
You’re going to hold a weight by your side with one hand.
Just like the name implies, you are going to walk with a weight like you would with a suitcase.
Here’s the catch, you have to keep your body from leaning from one side or the other.
Start with a light to moderate weight to get used to the form. Keeping a tall posture, you will pack in your shoulder and have a slight bend in the elbow.
Keep the hips square, slowly walk the designated distance or time and switch sides.
You can do time or distance, both are great options and can depend on what your environment looks like.
Not only will this work on the core, you are also working on shoulder stability, hand grip strength and endurance. When you build up to long distance or time, it can also be unconventional cardio.
Start with the weaker side first and you can start with a time of 15 seconds, slowly go up from there. You can also work on increasing weight, just be careful with your form.
STEP 5: BOTTOMS UP KB RACK CARRY
Your next progression will have a big stability component for the shoulder complex and your core.
It is bottom up kettlebell rack carry. Here’s how to set it up.
Grab your kettlebell, start with a light weight. The kettlebell will be upside down, being held by the handles with a single arm. The position of your arm will have a bent elbow, and the elbow will be pointing about 45 degrees from your center.
The thing about this exercise is that you have to be aligned perfectly in the joints to make this exercise work. The upside down kettlebell will put your grip strength to the test and greater demand on creating stability in the shoulder complex and core to maintain form.
Once you’re in position, slowly walk for the designated time or distance.
You can start with 15 seconds for each side, start with the weaker side first and repeat for 3 rounds.
STEP 6: WAITERS WALK
Here is your last progression for the anti-lateral flexion core work.
You will need a kettlebell for this exercise, and you’re going to lift the kettlebell up into the air. Lock down your shoulders and get into your tall posture.
Look into a mirror if you have to for a form check. The weight overhead will put demand on your shoulders, and having an overhead position will make it harder on the core to prevent movement.
Just like the other carry variations, you will walk for the designated time or distance then switch sides.
Start with 15 seconds of work and go up from there, and work on increasing the weight for your carries.
There you go, end of the series for how you can train your core better. I hope this gives you a better idea on what exercises you can do for your core that will have a better impact on how you move and how you feel throughout the day.
There are many other ways to work your core and other variations to perform. I just provided you with some examples.
If you have questions, feel free to email me at caruthers.fitness21@gmail.com. I am happy to help.