Mastering the Squat: The Complete Guide for Perfecting Form, Building Strength, and Maximizing Results
Squatting is a complex movement that incorporates multiple joints and muscles, so mastering the squat will take time and practice. It is also an essential movement with your day to day life. You can read why it is essential with one of my earlier articles, Squats are Essential for your Health.
With this article, my goal is to give you the tools you need in mastering the squat. I will provide you how to find your stance, form, form mistakes to watch out for. If you are brand new, I will give progressions from bodyweight to the barbell.
At the end I will provide you a squat warm up and a squat-based workout.
Before I give you all this information, it’s important to understand why it’s important to squat.
Benefits of Mastering the Squat
Squatting is much more than just an exercise. It is a fundamental movement pattern that it programmed in your brains since you were a baby.
No one teaches a baby how to squat, it is programmed to learn before walking. Before it was an exercise, you were squatting to pick toys up off the floor and putting it in your mouth. At least that’s my experience with my little ones.
Every time you go and sit down on the toilet or your couch, you are squatting. Overtime, if you don’t practice squatting, you lose the skill and strength to squat well. Eventually, you will need assistance to stand up from a sitting position.
Mastering the squat, the skill of the movement and getting strong, you can continue squatting down and back up from the toilet without assistance.
That’s my goal, when I am 80+ years old, I do not want anyone helping me on/off the toilet. I am sure you don’t want that either. For myself, that is the biggest benefit. Having the strength and skill to squat well into my older age.
Other benefits that you can experience from mastering the squat:
- Stronger legs and butt
- Decreased risk of injuries
- Mobile legs
- Strong core
- Bigger legs and butt
- Increase vertical jump
- Health benefits of just being stronger
- Stronger with other exercises (deadlifts, bench press, overhead press, etc.)
Muscles Worked During Squats
When you think about squats, you immediately think of quads and butt muscles, but there is more involved.
- Quads
- Glutes
- Hamstrings
- Calves
- Core Muscles
- Adductors
- Hip Flexors
- Core and Lower Back (Stability)
- Lats (Stability)
- Special Mention- All the small stabilizing muscles in the body
As you can see, the squat is more than a leg or butt exercise, it’s a full body exercise. Yes, the upper body is involved create stability and a neutral spine. I will go into this further later in the article, but when you do any exercise, you want to be intentional.
Even though squats are a leg exercise, be intentional on what the rest of your body is doing. Mastering the squat will require full body intention.
Getting Started Mastering the Squat
When mastering the squat, first you must find your foot stance and width. This will be different for each person. There is no single stance, and if someone says otherwise, they are wrong.
The hip joint alone can have 1,000 different variations which is just one variable on why someone’s foot stance will be different from another person.
So how do you find your foot stance?
The answer is it depends.
It depends on the goal of your squat. Why? Your squat stance will be different if you want full range of motion (ass to grass) versus maximum strength.
For example, a powerlifter’s goal is to lift as much weight as they can, squatting down to a certain depth, not full range of motion. They will have stance that allows them to squat as heavy as they can to competition depth. An ass to grass squat stance will not be your strongest stance.
So, the answer is, depends on the goal.
Finding your stance for full range of motion:
- Place feet shoulder width apart.
- Point feet 30 degrees out
- Brace the core, keep a neutral spine
- Squat down. Record yourself or have someone watch you. Stop as soon as your butt winks (rounds under you).
- Change your foot stance, go more narrow or wider.
- Repeat steps 2-5 till you find the stance that allows you to squat the deepest before your butt winks. Also pay attention to what feels good, that is also important.
Use these steps to find the stance that gets you a full range of motion with good form. If your depth is above knee level, you can slowly improve your depth. You can do this by getting stronger, improving movement faults like mobility or stability issue in the body. I will go more into this later in the article.
Create Torque in the Feet
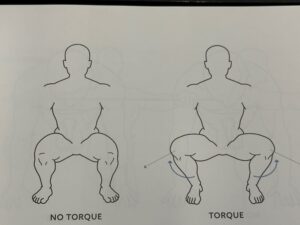
When mastering the squat, creatine torque, or rotational tension in the feet will help create a stable foundation.
Creating torque in the feet will create stability and tension up towards the hips. Having this stability will allow you to get more out of your squats. It all starts with being more intentional with your movement.
The whole body works together to accomplish a task, including the feet.
So how do you create this tension in the feet?
Once you found your foot stance, dig your feet into ground like roots of a plant. Without moving your feet, corkscrew or actively try and rotate your feet outwards. What you will notice is tension all the way up the hips.
Hold this tension in the feet the whole time you squat. Without this stability in the feet, the body would have energy leaks and potential dysfunction up the chain.
Bracing the Core
Once you have found your squat stance and created tension in the feet, going up the chain. The next area to focus on is bracing your core.
When mastering the squat, you need to create stability in the core/torso area. Without this stability, you will see form breakdown, and poor performance.
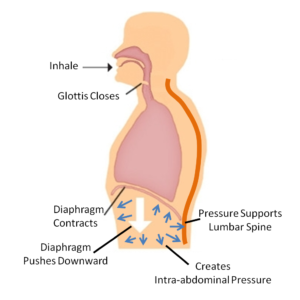
How do you brace your core?
First, act like you’re going to get punched in the stomach, hold that tension. Take a deep breath through the nose and fill your belly full of air. Think of it as a balloon, full 360 degrees of tension as you fill up with air. What I mean is, the tension is not only in the front, but also in your low back and the side.
Hold this 360-degree tension, play with the intensity of the tension so you can breathe.
Upper Back Stability
When mastering the squat, you can’t just think about the legs and the core, your upper body is just as important.
Without upper body stability, the torso will lean forward, losing stability in the rest of the body. This will lead to an increased risk of injury, or poor performance. When mastering the squat, you want a neutral spine throughout the whole movement.
When the thoracic spine fails, it will eventually lead to the lower spine moving. For obvious reasons, you don’t want the lower spine to move under load.
Here is how you can get your upper back to be stable. First, round your back as much as you can. Now, arch your back as much as you can. Find the middle of the two movements and hold that position.
After that, imagine an orange in your armpits, and squeeze the oranges to make orange juice. Doesn’t matter what squat variation you do, create this stability with your upper back.
Mastering the Squat Movement
Now that I have covered how to create tension from the bottom up (feet to the upper back), lets go over the movement.
First, get your feet in your squat position and create the tension from the bottom up. This will help create the stability you need to squat.
Now the movement:
- Start with a small hip hinge.
- Same time as the hip hinge, push the knees forward, lowering the hips down.
- Don’t be afraid to push the knees over the toes, it’s supposed to. (Keep the feet flat, and don’t forget the tension)
- While keeping a neutral spine, go as low as you can.
- Coming back up, think of pushing the ground away from you. At the same time, push your hips forward. Don’t push so far till you lose tension in the core and overarch the back. Push forward till you are standing tall.
Practice this form till you feel comfortable with your squat. If you are having trouble with your depth, use a camera to help you find when your form breaks. Using a box, you will tap your butt right before the form breaks down. This can help you feel more comfortable while mastering the squat.
Mastering the Squat with Progressions
1. Goblet Squats
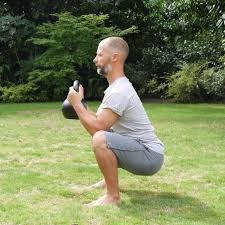
The first progression to mastering the squat are goblet squats. Goblet squats is when you hold a dumbbell or kettlebell with your hands in front of your chest and squatting.
This squat variation is perfect for all levels to build strength, muscle, mobility, and squat skill. The form is the same as what I described above, but now you’re holding a weight. To help create stability, squeeze your elbows together and still think of oranges in the armpit, crush the orange.
The weight in front of you will help you feel your core more and push your center of mass forward, which will allow you to squat deeper and more stable compared to bodyweight.
Get strong with this squat variation, you will want to work up to doing 50% of your bodyweight for 25 reps.
2. Single Arm Front Rack Squat
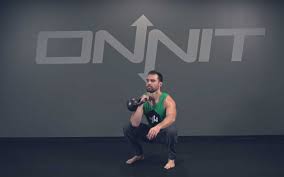
Next progression to mastering the squat will be the single arm front rack squat. This variation will put more emphasis on core and shoulder stability. The stability is needed to be strengthen for the next progressions.
This exercise is best with a kettlebell in a rack position. The rack position is when you hold a kettlebell is held comfortably against the chest with the arm tucked in, wrist straight, shoulder packed down. As the name applies, you will be doing this with a single arm, the other arm will be free.
While squatting with this position, the trick is to keep the chest and hips squared. This means no rotation or bending of the body. This is a great variation to help with mastering the squat to build stability and better your form.
Parents, this is an exercise to pay attention to. You know holding a baby one sided can be exhausting and put lot of stress in the shoulders and low back. Developing the skill and strength with this squat variation will help you hold your baby without compromising your body.
3. Double Kettlebell Front Rack Squat
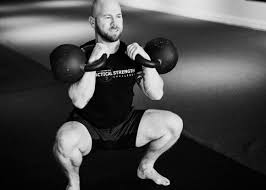
After the single arm rack squat, your next progression for mastering the squat will be the double kettle front rack squat.
This variation will let you build strength and capacity from the stability you worked on from the last squat variation.
I prefer kettlebells for this exercise because you can get in a better position and more stable compared to dumbbells. If you don’t have access to kettlebell, feel free to use dumbbells.
The form is like the single arm rack position, but obviously this variation uses both arms at the same time.
4. Barbell Front Squats
Once you build the skill of squatting and create a foundation of strength and stability, you can introduce the barbell for mastering the squat.
Using a barbell will help you build your strength due to the stability of the bar and the capability of loading weight to the barbell. Like the goblet squat, your center of mass is pushed in front of you, which helps you have a more upright posture as you squat down. This will target the quads more than the next squat variation, barbell back squat.
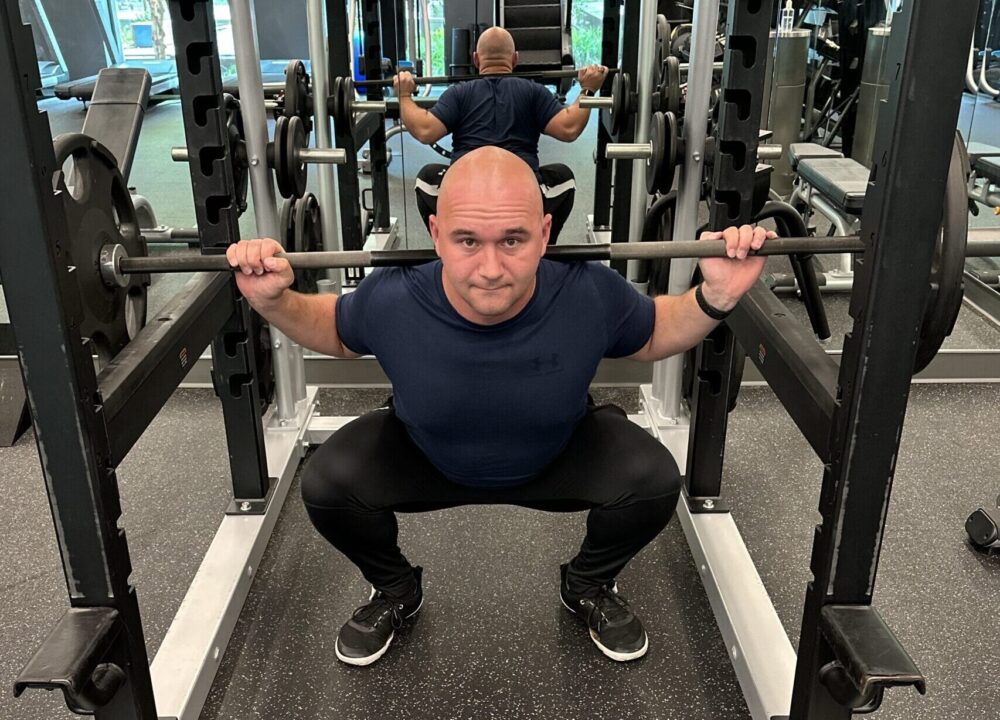
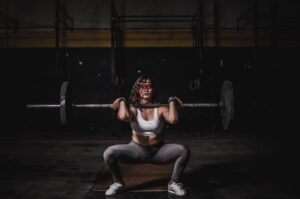
5. Barbell Back Squat
Last progression to you mastering the squat is the barbell back squat. This variation takes the most skill to learn due to the number joints and muscles involved.
The barbell back squat requires shoulder and thoracic mobility, core stability, hip mobility, ankle mobility, and coordination. Lot of moving parts with the barbell versus goblet squat. This is why I have this progression, to help teach you how to squat and build the necessary mobility and stability.
With the barbell back squat, this is where you can push the weight for strength and building muscle.
Restrictions Keeping You from Mastering the Squat
In this section, I want to go over common issues people have with their squat form that is going to keep you from mastering the squat.
Starting at the bottom I will go over the ankle complex and will go up the chain of the body to the shoulders. With each section I will tell you what to look out for and how you can fix it.
1. Ankle Mobility
First restriction that people will run into that keeps them from mastering the squat is the lack of ankle mobility. What that will look in your squat is vertical shins with your torso leaning forward. The hips are shifted back versus going down, looking like a good morning.
The mobility in your ankle allows the knee to track over the toes, without this mobility the knees can’t move forward, making your squat depth inadequate.
Here is what you can do to work on your ankle mobility:
- Foam roll the calves– 30 seconds (slow with 1-3 in oscillations as you work up the calf)
- Find the spot that hurts and stay on the spot and roll the ankle and flex the ankle for 20 seconds. Do this for both calves.
- Combat stretch– Get into a ½ kneeling stance and drive the knees as far as you can over the toes without letting the heel lift. Preferably do this with no shoes. For 30 seconds oscillate into end range and neutral- then 15 seconds end range hold with toe lifts. Do the this for both sides.
Do this for your warmups, your active recovery days, or whenever you get a chance. The more you do mobility work the better your ankles will feel.
2. Hip Mobility
Mastering the squat will require adequate hip mobility. Without good hip mobility, your squat form and performance will suffer. Other parts of the body will compensate which can lead to chronic issues and potential injury.
Let’s avoid that, okay?
Hip mobility is a little complex due to the ball and socket joint. What this means is that the hip joint is a very mobile joint that create a circular or a conical type of movement. This is only possible with the ball and socket joint. The shoulder is another example of this type of joint.
What this means is that the hip can rotate inward, outward, move front and back, and side to side.
To help you get started with mobile hips, this exercise will cover both internal and external rotation of the hip joint. Remember, with these mobility exercises, intent is the key. Do no go through the motions, be intentional with the muscles surrounding the joints.
- Hip 90/90: Sit on the ground with one leg in front at 90 degrees. The other leg will be 90 degrees behind you. The side leg, the knee should be in line with your shoulders.
- Keeping a neutral spine, lean forward till you feel a stretch in the glutes. You should be able to breathe comfortably in this position.
- While holding this stretch, actively push the front ankle and knee into the ground. Keep the core tense and glutes squeezing. Hold this push for 15 seconds (don’t forget to breathe). Repeat this for 5 rounds with 15 seconds of rest in between sets.
- While holding the stretch, keeping a neutral spine, tense up and lift the back foot off the ground as high as you can. Hold this position for 3-5 seconds and slowly lower back down to the ground. Each time you lift the foot, lift higher and higher (don’t forget to breathe). Perform 10 reps then switch to the other side.
The hip 90/90 exercise should be performed as a warmup on your lower body days. You can also do this every single day, and preferably multiple times a day to help mastering the squat.
3. Core Stability
You are probably aware on how your core can influence your squat form. Having poor core stability will not only mess with your form, but also your performance. If mastering the squat is a goal of yours, you will need a strong core.
What does poor core stability look like in a squat?
Great question. Here is what you need to pay attention to:
- Low back overarched.
- Ribs flared out.
- Poor hip mobility can be the result of poor core stability.
- Forward lean of your torso.
- The feeling of unstable or presence of wobbliness.
- Lack of depth.
- Uncontrolled breathing patterns.
This is not a complete list, but they are the most common. The problem with the core is that it is complex and consist of over 30 muscles, all having to work together.
The core is responsible for creating tension around the spine to prevent unwanted movement and to create wanted movement.
Here is how you can create and resist movement with the core:
- Lateral flexion/Anti-Lateral Flexion
- Extension/Anti-Extension
- Flexion/Anti-Flexion
- Rotation/Anti-Rotation
Exercise examples for each, respectively:
- Side Plank Hip Drops/ Copenhagen Planks
- Supermans/ Planks
- Crunches/ banded deadbugs
- Kneeling chops and lifts/ Pallof Press
It is important to train all of these in some capacity. Whether you incorporate into your warmups to feel more stable, or as a finisher to help build your core, work it.
You will also get some core work in from lifting as well. Good mornings and deadlifts are good examples of anteflexion. Single arm rows can be used for rotation and anti-rotation, depending on how you program it.
Use the isolated exercises to build familiarity and some stability but use the compound lifts to reinforce and strengthen the core. To learn more about core stability, check out my core blog series.
4. Upper Back
When you think about mastering the squat, the upper back is easily forgotten about. Without the upper back, you lose tension in your core, limiting your performance. You will also have a rounded upper back which could lead to rounding of the lower back.
You need both, upper back mobility and stability, depending on the squat variation. While using the barbell for front and back squats, you need upper back mobility to use the bar. You need stability to keep the back from rounding and help engage the core better.
Here is what to look out for with poor mobility and stability in the upper back:
- Rounding of upper back (Stability)
- Overarching low back (mobility)
- Ribs flared out (mobility & Stability)
- Elbow pain (mobility & Stability)
- Shoulder pain (mobility & Stability)
- Elbows flared out (Mobility)
- Wrist bent backwards (mobility)
When you learn what you are needing, incorporate it into your warmups to help you with your squats, and be intentional of area while squatting.
Warming Up to Mastering the Squat
Having a proper warm up will do multiple things to help with you mastering the squat:
- Mobilize tight muscles/joints to allow greater range of motion
- Allows you to practice the squat form, become more efficient
- Increase neural drive to help you increase performance
- Increase heart rate and blood flow
- Helps you overall move and feel better
To help you take any guess work out of what you need to do for your warm up, I will give you a warm up to prepare your body for mastering the squat.
1. SMR Calves-30 secs oscillate; 30 secs Ankle rotations and flexing
2. Combat Stretch – 30 secs oscillate, 15 secs end range hold
3. Banded Deadbugs 30 secs alternating legs slowly
& Copenhagen Planks 30 seconds each side
4. Banded Glute Bridges 3×10 reps-20 seconds rest
6.Jacks & Vertical Depth Drop Jump 3 sets of 5 jacks & 1 jump 10-20 seconds rest
This should take you anywhere between 10-15 minutes to complete. Put full intent into this warmup and I promise your going to feel great afterwards and ready for your squats.
Lastly
Lastly, I want to talk about how you shouldn’t rush each progression. This is a journey with no end goal, so enjoy the process. Take your time and get good with each squat progression.
I also want to mention, when you progress to different squat variations, that doesn’t mean you never have to do the other squats again.
Mastering the squat requires variability in your program. Cycling in different squat variations throughout the year will not only help you progress, but also keep your joints healthy.
As I mentioned earlier, this is a journey, and you want to stay healthy during this journey. I know when I am 80, I want to still be able to hit the gym and do these lifts. I also want to be able to get to the floor and back up or sit on the toilet without aid.
You probably feel the same way, so take your time and cycle in different squat variations throughout the year.
Thank you for reading, I hope this helps you with mastering the squat.